How to Fix Jagged Edges After Image Vectorization
Stair-steps, wobbly edges, sawtooth outlines: where jagged edges in an SVG come from, what our measurements say about the source and the settings, and how to fix them without losing the shape.
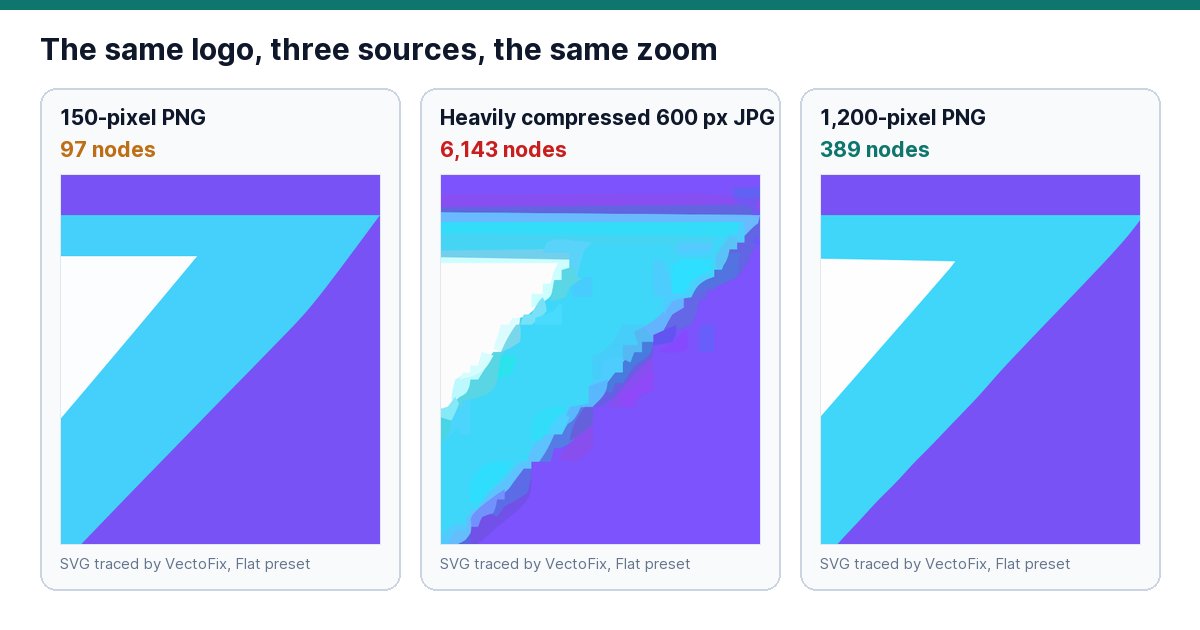
Jagged edges in an SVG usually come from the starting image: too small or too compressed, and the tracer faithfully follows its defects. Go back to the biggest, cleanest source you can find, trace with curves, leave the corner threshold at its default, then repair the stubborn zones locally instead of changing everything.
You zoom in on the result and the edges look like staircases or wobble along what should be a smooth line. It is one of the most common complaints after tracing. Rather than list tips, we measured the effect of each cause on the same logo. For the overview, see how to fix an SVG after automatic vectorization.
Where do jagged edges come from?
- A low-resolution source. If the original shows stair-steps, the tracer has to guess the real shape from very few pixels.
- JPG compression. Blocky artefacts around edges are traced as real wobbles.
- Polygon mode. Tracing with straight segments instead of curves gives faceted edges by definition.
- Anti-aliasing fringes. Edge pixels in an in-between color create a thin zone the trace can follow as a ragged outline.
- An extreme corner threshold. It decides at what angle a turn becomes a corner: set badly, it damages corners or curves.
What do the measurements say about the source?
We traced the site's demo logo with VectoFix's Flat preset, starting from different versions of the same image. The gap is the average difference between the rendered SVG and the original logo, on a scale of 0 to 255: the lower, the more faithful the trace. This is a single logo, so read it as an order of magnitude.
- 100-pixel-wide PNG: gap 2.81, 105 nodes.
- 300-pixel PNG: gap 1.14, 160 nodes.
- 600-pixel PNG: gap 0.65, 248 nodes.
- 1,200-pixel PNG: gap 0.41, 389 nodes.
- 600-pixel JPG, light compression: gap 1.72, 1,639 nodes, 140 shapes.
- 600-pixel JPG, heavy compression: gap 4.72, 6,143 nodes, 452 shapes.
Two lessons. Making the source twelve times bigger cuts the gap by a factor of seven: it is the strongest lever, and it costs nothing if you have the file. Compression, for its part, is worse than small size. At 600 pixels, the PNG gives 5 shapes and 248 nodes; the heavily compressed JPG gives 452 and 6,143, with a result less faithful than the 100-pixel PNG.
What if you only have a small image? Enlarging it in a photo editor is not enough. Our 150-pixel PNG, enlarged four times by interpolation before tracing, gave a gap of 2.26 against 1.90 without enlarging, and 3,302 nodes against 97. Enlarging adds no information, it multiplies the in-between edge pixels. Look instead for the original file from whoever created the logo.
Which settings really make a difference?
The first setting to check is the mode. Choose Curves rather than Polygons: in polygon mode, the same 600-pixel PNG gives 180 nodes and no curves at all, so facets show when zoomed, even if the measured gap stays close (0.72). This mode is only justified for intentionally angular artwork.
The corner threshold has less effect than people think. On the 600-pixel PNG, moving it from 20 to 90 changes almost nothing: between 245 and 259 nodes, gap of 0.65 to 0.67. Beyond that, corners stop being read as corners and the result degrades: at 120 the gap doubles (1.21) and nodes climb to 329. Conversely, dropping it to 20 on a small 150-pixel PNG removed nodes (81 against 97) but also hurt fidelity (2.44 against 1.90). So leave the default, 60, and do not look there for a cure for a jagged edge.
That leaves the speckle filter: it removes the small specks created by compression, as explained in our article on tiny shapes and artifacts in an SVG. Change one setting at a time and look at the result, or you will not know which one did the work.
How do you smooth a single bad edge?
If only a few edges are rough, re-tracing the whole image costs more than it gives: you risk damaging what was fine. Better to treat those zones alone. In VectoFix, you paint over the damaged edge; the zone is enlarged, re-traced with fine settings, then merged back into the SVG. The Damage map shows where the trace strays furthest from the image.
Each repair adds nodes. On our three test images, Faithful mode gains an average of 68% fidelity in the painted zones for 21% more nodes across the file, and Light mode 62% for 13%. If the file is going to a cutting machine, keep an eye on that counter, as explained in why too many SVG nodes are a problem for cutting machines.
One limit to know: VectoFix re-traces from your image, it does not invent a shape the pixels no longer contain. It does not edit paths node by node either. On a source that is truly too poor, smoothing by hand in a vector editor remains necessary: in Inkscape, Path > Simplify (Ctrl+L) softens a curve, at the cost of corners that are sometimes rounded.
Does smoother mean lighter?
No. Our measurements even show the opposite on good sources: the most faithful trace, from the 1,200-pixel PNG, has 389 nodes against 105 for the 100-pixel one, because it follows the real details better. The file to avoid is the compressed JPG, both heavy and poor. So look at fidelity and node count together, and stop when the edge is smooth enough for the final use: a sign or a large-format print demands more than a small web icon.
How do you check the result?
- Zoom to 400% or more on the worst edges, and flick between the result and the original.
- The outline should follow the intended shape, not the pixel staircase.
- Real corners must stay sharp: too much smoothing rounds them.
- Check long curves, where wobbles show the most.
- Look at the file at its working size: a defect visible at 800% may be invisible on a business card.
Conclusion: smooth the cause, not the symptom
Fix the source first, then check the trace mode, then treat the stubborn zones. Do not spend your time on the corner threshold. VectoFix offers 3 full-resolution exports to try on your own files, and Pro is a one-time €39. If the problem goes beyond a few edges, see how to fix a bad vectorization without starting over.
Frequently asked questions
Why does my SVG have stair-stepped edges?
Usually because the source image is small or compressed, or because the trace used polygons. On our test logo, the source had far more effect than the settings.
Should I change the corner threshold?
Rarely. Between 20 and 90 it changed almost nothing on our 600-pixel PNG, and above 120 the result degraded. Leave the default unless you have a specific need.
Does enlarging the image before tracing help?
Not with plain interpolation: in our test the result was less faithful and much heavier. It is better to find the original file.
Can I smooth only part of an SVG?
Yes, by re-tracing only the rough zones, which is what the VectoFix brush does. The rest of the file does not move.
Does smoother mean a lighter file?
Not necessarily. Look at fidelity and node count together.
A vector export that lost some detail?
VectoFix shows you exactly where, and lets you fix it with a single brush stroke — full trial, on your own machine.
Get VectoFix