Logo for Embroidery: Preparing a Simple Vector File
Few colors, bold shapes, details big enough: how to simplify and vectorize a logo before handing it to an embroiderer, with a real measurement of the colors a soft shadow creates.
For embroidery, simplify: as few colors as possible, bold shapes, no stroke finer than a thread. Vectorize the logo in flat colors, merge neighboring shades, remove specks, then send the SVG to your embroiderer, who digitizes it with their own software. VectorPop prepares the drawing; it does not produce the file the machine reads.
A clean SVG does not do the embroidery for you, but it spares the embroiderer from cleaning your file before starting. This article explains what to simplify, what the embroiderer really does, and what a soft shadow or gradient does to the number of colors, with a measurement made on VectorPop's demo logo.
Why does a logo need simplifying for embroidery?
A printer lays down tiny dots; a needle lays a thread that has width and thickness. A detail finer than the thread cannot be embroidered, however sharp it looks on screen. And each color is in principle a thread change, so machine time, which is why many shops limit the number of colors or price accordingly.
Shops publish minimums. Custom Ink, for instance, recommends text at least 0.25 inch tall (about 6.35 mm) and strokes at least 0.05 inch (about 1.27 mm), and states that gradients cannot be embroidered. Other shops give slightly different figures: they are orders of magnitude, not a standard. Ask your embroiderer for their guidelines before simplifying.
What does the embroiderer do with your file?
They digitize the logo: they convert it into a stitch file by choosing the stitch type for each area, the embroidery order, the density and the thread direction. This is done in embroidery software, often by hand for a detailed logo, sometimes partly automatically for simple shapes. The result is a machine-specific file in an embroidery format, which VectorPop does not produce.
Your SVG is the model. The simpler it is, the faster and more faithful the digitizing. A file full of small specks forces them to be deleted one by one; a logo in three clean flat areas digitizes almost as is. Also state the final size and the item (polo, cap, bag): a cap tolerates less detail than a sweatshirt.
How many colors should you keep, and what does a shadow change?
As few as possible. We measured it on VectorPop's demo logo (a lightning bolt on a purple background, 3 colors), rendered at 600 pixels, with the "Flat logo (color)" preset and default settings:
- Clean source: 3 colors, 4 shapes. Nothing to clean.
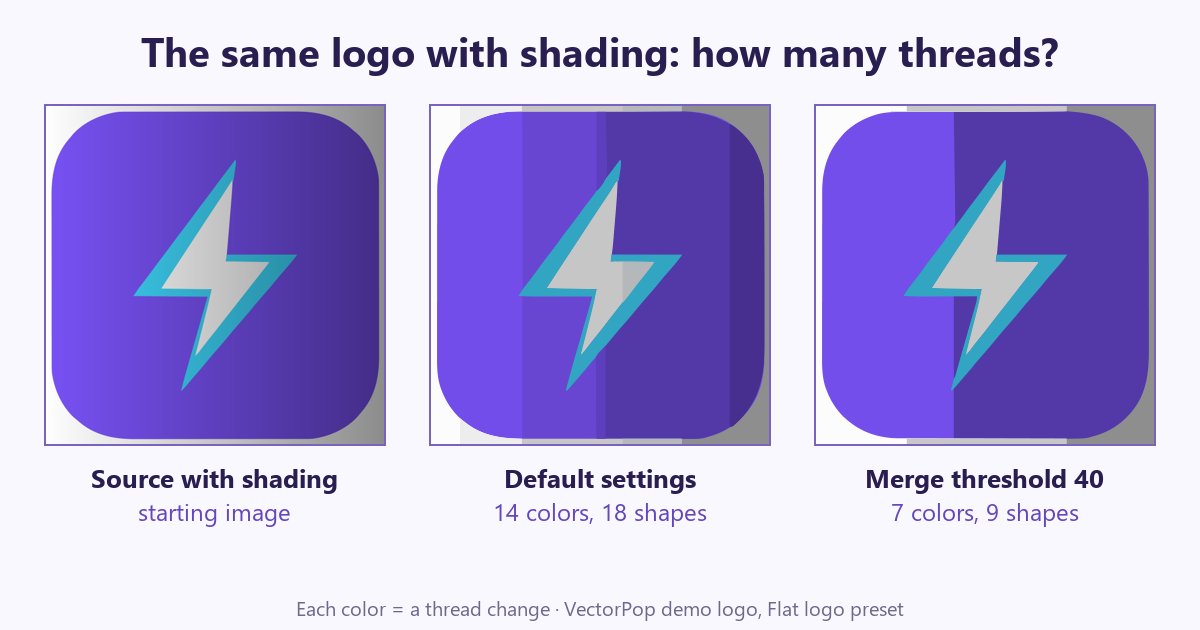
- Same logo with a shading (progressively darkened from left to right, like a soft shadow effect): 14 colors and 18 shapes. The purple, the white and the cyan were cut into bands of nearly identical shades.
- Same source, "Merge thresh." raised from 24 to 40: 7 colors and 9 shapes.
- "Merge thresh." at 60: 7 colors and 8 shapes, almost no further gain.
- "Black & white / line art" preset: one color, one path.
Two lessons. A gradient, even a discreet one, turns into a series of colors the embroiderer will have to group, and "Merge thresh." helps a lot without fixing everything: 7 colors remain for a logo that really has 3. It is better to remove the shading at the source, going back to the original flat-color logo, than to count on the settings. If your logo exists in a one-color or two-color version, that is the best base for embroidery.
Do not lower the "Colors" slider to reduce the number of threads: it sets detection precision, not the number of colors in the result, and can merge two real colors, as we saw on the same logo in the vinyl cutting article.
How do you vectorize the logo in practice?
- Start from the best source: a sharp, large enough PNG, not a screenshot or a compressed JPEG. Compression creates stray shades that the trace faithfully reproduces, see converting a JPG to SVG.
- Pick the "Flat logo (color)" preset, or "Black & white / line art" for a one-color logo.
- Tick "Merge colors" and raise "Merge thresh." until you recover the logo's real colors.
- Raise "Denoise" to remove small specks; in Pro, "Remove a shape" lets you click a shape to delete it.
- Look at the result at the embroidery's final size: a stroke that looks fine on screen may be too thin once reduced to a few centimeters.
The detailed steps, with the exact interface labels, are in vectorize a PNG logo step by step. For a precise measurement of shapes too thin at a given size, the VectoFix article preparing an SVG for embroidery counts, on a real trace, the areas narrower than 1.27 mm.
What should you simplify in the drawing itself?
- Very fine strokes: thicken or remove them, in a vector editor.
- Small text: enlarge it or drop it; a line of lowercase text cannot be embroidered at 6 cm wide.
- Gradients and shadows: replace them with flat colors.
- Details that touch: a small gap between two shapes can vanish under the stitches.
If needed, plan a simplified version of the logo reserved for embroidery, next to the full version used for printing. To understand why professionals ask for a vector file rather than an image, read why printers ask for vector files.
Which tool should you use to prepare the logo?
A vector editor can do everything, but takes practice. To quickly turn a PNG into clean flat areas and control color merging, VectorPop runs on your computer, without uploading the logo: 5 free SVG exports, then 39 € once for the Pro version, no subscription. It does not digitize for embroidery: that step happens at the embroiderer, with their software.
Conclusion
For embroidery, the right file is a simple one: few colors, bold shapes, details big enough. Vectorize in flat colors from a clean source, merge shades, remove specks, check at final size, then ask the embroiderer for their guidelines before sending the SVG.
Frequently asked questions
Does VectorPop digitize for embroidery?
No. It produces a clean SVG; digitizing, which produces the stitch file the machine reads, is done by the embroiderer with their software.
How many colors for an embroidered logo?
As few as possible: each color is in principle a thread change. In our test, a light shadow took a logo from 3 to 14 colors with default settings.
Can a gradient be embroidered?
Not faithfully: shops advise flat colors. Replace the gradient with a few bold colors before vectorizing.
Can small text be embroidered?
Only if big and bold enough: one shop recommends at least 6 mm tall. Ask your embroiderer for their limit.
Which format should I send the embroiderer?
SVG is a good starting point, but ask for their guidelines: some also accept a sharp PNG, EPS or PDF.
Got a logo stuck in a PNG?
Try VectorPop free and turn it into a clean, editable SVG — on your own machine.
Get VectorPop