Preparing an SVG for Embroidery: Avoiding Micro-Shapes and Overly Fine Details
Why micro-shapes, hairlines and stray colours cause trouble in embroidery, what we measured on a real trace, and how to simplify a logo before it is digitised.
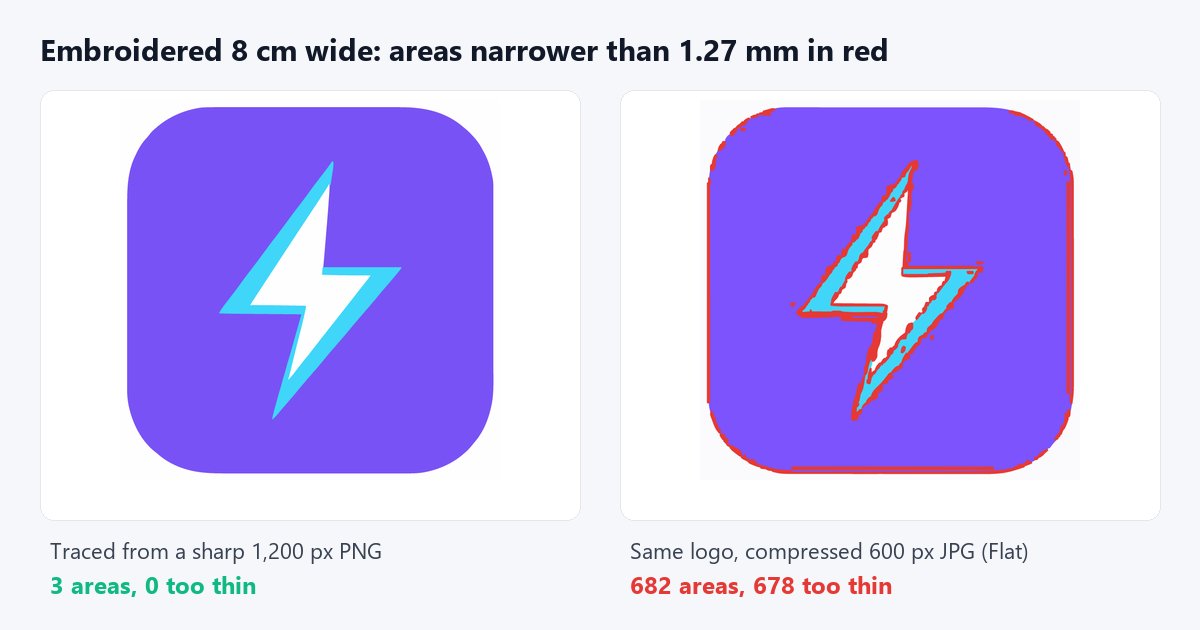
To prepare an SVG for embroidery, simplify it before it is digitised: remove micro-shapes and specks, merge near-identical colours, make every stroke at least as wide as a thread can follow, and enlarge small text. The surest way to get there is to trace from the cleanest, largest source you have. A thread has a physical width: a detail finer than that cannot be stitched, however crisp it looks on screen.
Embroidery turns a vector into stitches, and a thread is very thick compared with a pixel. A traced logo full of specks and slivers gives the digitiser, the person or software that turns the design into a stitch file, hundreds of shapes to clean up or delete. We measured this on a real trace. This article is general guidance and not specific to any embroidery software: your digitiser or your software's documentation has the exact limits for your machine and fabric. For a broader checklist after tracing, see how to fix an SVG after automatic vectorization.
Why is embroidery different from printing or cutting?
A printer can place a tiny dot, and a cutting machine can follow a very thin line. A needle and thread cannot: the thread has a width, and stitches need room. A shape narrower than the thread cannot be filled, and a very small shape becomes a knot of overlapping stitches or simply disappears.
Embroidery suppliers publish minimums. Custom Ink, for example, recommends text at least 0.25 inch high (about 6.35 mm) and lines at least 0.05 inch thick (about 1.27 mm), and states that gradients and halftones cannot be embroidered. Other shops quote slightly different figures, so treat them as orders of magnitude, not as a standard. Remember too that an SVG is not what the machine reads: the design must be digitised into a stitch file, and everything you simplify beforehand is work the digitiser does not have to guess.
What did we measure?
We took our demo logo, which has three colours and three shapes, and traced it with VectoFix's Flat preset from two sources: a sharp 1,200-pixel PNG, and the same logo as a 600-pixel JPG saved at very high compression, the kind of file you get from a website or a messaging app. We then scaled each result to 8 cm wide, a size chosen for the example, and counted the visible areas once the layers are stacked, along with those narrower than 1.27 mm at their widest point.
- Original vector logo: 3 shapes, 3 colours, no area too thin.
- Traced from the sharp PNG: 4 paths, 3 colours, 3 visible areas, none too thin.
- Traced from the JPG with the speckle filter at 0: 2,045 paths, 1,360 visible areas, 1,356 of them too thin.
- Traced from the JPG with the Flat preset (filter 4): 168 paths, 682 visible areas, 678 of them too thin.
- Traced from the JPG with the filter at 8 and colour merging at 40: 18 paths, 225 visible areas, 221 of them too thin.
Two lessons. The settings help a lot: going from filter 0 to filter 8 with stronger colour merging removes most paths. But they do not rescue a poor source: more than two hundred slivers remain along the edges, where compression created fringes of slightly different colour. From the clean source, there is nothing to clean up at all.
Which defects hurt most in embroidery?
- Micro-shapes and specks. Each one is an isolated area to stitch, with a jump of thread to reach it, or a shape the digitiser has to delete by hand.
- Edge fringes. Thin bands of a nearly identical colour around each shape, typical of a compressed JPG. They are too narrow to stitch and blur the outline.
- Too many colours. Each colour is potentially a thread change. Our JPG trace produced over a hundred slightly different fills for a logo that really has three.
- Hairlines. Strokes finer than a thread cannot be rendered cleanly: they need to be thickened or removed.
- Rough edges. Wobble in the outline shows in the direction of the stitches. See how to fix jagged edges after vectorization.
How do you simplify the artwork before digitising?
- Start from the best source. Ask for the original file of the logo rather than a capture or an image pulled from a website. It is the step that had the most effect in our measurements.
- Raise the speckle filter to remove specks, as explained in how to fix tiny shapes and artifacts in an SVG.
- Raise colour merging until you are back to the real colours of the logo, no more: merging too far can fuse two genuine colours.
- Thicken fine strokes to a width a thread can follow, or turn them into filled shapes; remove details that will be smaller than a few millimetres at the final size.
- Check the node count of the result; dense paths complicate every later step, as why too many SVG nodes are a problem explains.
What about small text?
Small lettering is the classic problem: at small sizes, the holes in letters and the thin strokes close up. Increase the text size, choose a bolder font without fine serifs, or simplify the lettering. Then think in millimetres at the real size: a word that looks fine on a 1,000-pixel preview may end up 3 mm high on a chest logo, well below the minimums suppliers recommend.
What can VectoFix do, and what can it not do?
VectoFix improves the trace itself. Its Damage map shows where the SVG departs from your image, the brush re-traces a damaged area without touching the rest, and the fidelity score and node count tell you whether a correction has improved or worsened the file. The speckle filter and colour merging settings are the ones we used above.
It does not digitise embroidery. It does not create stitch files, choose stitch types, set density or reduce colours to a thread chart: all of that happens in your embroidery software or with your digitiser. It also does not measure the width of each shape in millimetres; our counts above come from a separate measurement script.
What should you check before sending the file to a digitiser?
- The real size: give the final width in centimetres, and check your smallest text and finest stroke at that size.
- The colour count: it should match the colours you want embroidered, not a hundred nuances.
- No specks: zoom in on the edges and on the background, where isolated shapes hide.
- No gradients, shadows or halftones: they cannot be stitched as such.
- Fidelity: the result must still look like your logo; the checklist in how to fix an SVG before sending it to a laser cutter applies here too.
Conclusion: design for the thread
Simplify before you digitise. A clean, bold logo with few colours stitches better than a faithful but fussy trace, and the cleanest trace starts from the cleanest source. VectoFix offers 3 full-resolution exports to try it on your own files, and Pro is a one-time €39 purchase. If your files are also used for vinyl cutting, see how to clean up a vector before vinyl cutting. To start from the logo rather than the SVG, and see what a soft shadow does to the number of colors, read logo for embroidery: preparing a simple vector file.
Frequently asked questions
Why do micro-shapes cause problems in embroidery?
A thread has a physical width: a shape smaller or narrower than that cannot be filled. It becomes a knot of stitches, a needless thread jump, or a shape the digitiser has to delete.
What minimum sizes should I aim for?
As an order of magnitude, Custom Ink recommends text at least 6.35 mm high and lines at least 1.27 mm thick. Ask your digitiser for the limits of your machine and fabric.
Should I reduce colours for embroidery?
Yes, back to the real colours of the logo. Each colour can mean a thread change, and a compressed JPG easily produces dozens of near-identical shades.
Can settings fix a trace made from a bad image?
Partly. In our test, a stronger speckle filter and colour merging cut paths from 2,045 to 18, but more than two hundred slivers remained. A clean source left none.
Does VectoFix digitise for embroidery?
No. It improves the SVG; digitising into a stitch file is done in your embroidery software or by a digitiser.
A vector export that lost some detail?
VectoFix shows you exactly where, and lets you fix it with a single brush stroke — full trial, on your own machine.
Get VectoFix