How to Convert a Logo From PNG to SVG for High-End, Large-Format Print
Banners, signs, wayfinding: what we measured when enlarging a vectorized logo to 2 metres, why the on-screen score is not enough, and the checks to run before sending the file.
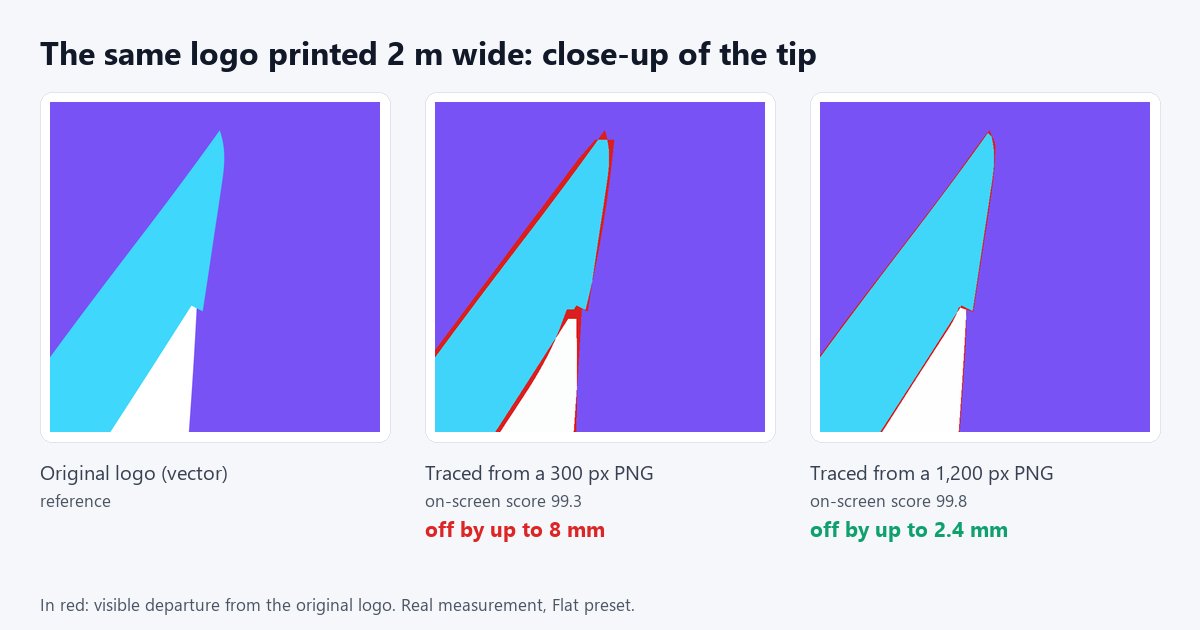
To print a logo at large format, vectorize it from the largest and cleanest source you can get, in flat colours, then check it at the scale it will be printed, not at screen scale. A trace that looks perfect on your monitor can be several millimetres off the original logo once enlarged on a banner. Then check the key colours and ask the printer for the exact format they expect.
Large print magnifies everything. To measure how much, we took a demo logo (a purple rounded square and a lightning bolt, three colours), exported it as a PNG from 150 to 2,400 pixels wide, and traced it with VectoFix's Flat preset. Each resulting SVG was then enlarged as for a logo printed 2 metres wide and compared with the original vector logo. For why printers ask for a vector file in the first place, start with why printers ask for vector files.
Why doesn't a logo that looks perfect on screen hold up on a banner?
Because a tracer only knows your PNG. It draws curves that pass as well as possible through its pixels; between two pixels, it guesses. On screen, that guesswork fits inside one pixel and is invisible. Enlarged fifty times, it becomes a curve that clearly departs from the original.
That is exactly what our measurement shows. Traced from a 300-pixel PNG, the logo gets a fidelity score of 99.3 out of 100 on screen, computed as in VectoFix. Printed 2 metres wide, its outline is nonetheless up to 8 mm off the original logo, especially at the tips of the bolt (see the image). The score is not wrong: it says the SVG looks like your PNG. It cannot say what your PNG did not contain.
What source size do you need for large-format print?
The largest available, because the error at print size drops sharply with the size of the source. Here, for a logo printed 2 metres wide, is the maximum offset we measured between the outline of the trace and that of the original logo:
- 150-pixel PNG: on-screen score 98.8, off by up to 17 mm.
- 300-pixel PNG: on-screen score 99.3, off by up to 8 mm.
- 600-pixel PNG: on-screen score 99.6, off by up to 5 mm.
- 1,200-pixel PNG: on-screen score 99.8, off by up to 2.4 mm.
- 2,400-pixel PNG: on-screen score 99.8, off by up to 2 mm.
Two honest remarks. First, the on-screen scores are all excellent and very close: on their own, they cannot tell you which source is right for a banner. Second, beyond 1,200 pixels the gain becomes small; the floor of about 2 mm partly comes from the measurement itself (edge smoothing when rendering). Our logo is simple: a logo with thin lettering or small details needs an even larger source. If all you have is a small file, see how to vectorize a low-resolution logo without losing details.
What those millimetres mean to the eye depends on viewing distance: a banner read from ten metres forgives more than a sign seen up close or a shop window. Your printer knows those distances; the question for you is simply whether your trace is faithful at that scale.
How do you check the trace at print scale?
Zoom in hard, area by area, comparing with the original. In VectoFix, hold the Space bar to show the original in place of the SVG render at the same zoom, and open the damage map: it highlights in red where the SVG departs from your image. Look first at what gives away a rough trace once enlarged:
- Tips and sharp corners, which tend to round off or shift.
- Long curves, which must stay even, without small wobbles. See how to fix jagged edges after image vectorization.
- Letters and their counters (the inside of an 'o' or an 'e'), which must keep their proportions.
- Specks: a one-pixel spot invisible on screen becomes a mark several millimetres wide. See how to fix tiny shapes and artifacts in an SVG.
When an area is damaged, repair it locally rather than re-running the whole trace with other sliders: with the Brush, VectoFix re-traces only the painted area and leaves the rest alone. That is the method described in how to fix an SVG after automatic vectorization.
Do the logo's colours stay exact?
Nearly, but not necessarily to the exact code. A tracer builds its palette from the pixels, and the smoothed edges of a PNG mix shades. On our logo, the purple came out identical (#7952F5), but white became #FEFEFE instead of #FFFFFF, and the cyan #3FD6FA or #41D4FA instead of #3FD7FB, depending on the source size.
Those differences are invisible to the eye, but they matter in two cases. If your brand guidelines require precise codes, replace the SVG's colours with the right values in an editor. And if white must be printed with white ink, or on the contrary let the material show through (vinyl, textile, acrylic), an 'almost white' may be treated as a colour to print: set it back to pure white and ask the printer how they handle white. For print colours (CMYK, Pantone), they are also the ones to tell you how to specify them.
Which format should you send the printer?
The one they ask for: ask before sending. Many printers accept SVG, others prefer a vector PDF, an AI or an EPS file. VectoFix exports SVG (and PNG); for a vector PDF, open the SVG in a program such as Inkscape, which is free, and save a copy as PDF. The curves stay curves: the file does not turn back into an image.
- Text: a vectorized logo contains no font, the letters are already shapes. No risk of a missing font at the printer.
- Final dimensions and bleed (the overflow margin around the printed area): ask the printer for the values.
- Colour mode and how to specify the brand colours.
- A proof: for an expensive sign or banner, ask for a proof, or even a printed proof of a detail at full scale.
What if the source is too poor for large format?
Look for a better source first: the original file from the client or the designer, a larger version on their website, a press kit. For a logo of a few hundred pixels destined for a sign, it is almost always the best use of your time. Failing that, repair the areas that show at print scale, and redraw the essential shapes (the letters of the name, a symbol) by hand in an editor. The result will be a clean logo, not an exact copy: tell the client. To understand where the differences come from, read why a PNG to SVG conversion doesn't look like the original.
Conclusion: judge the file at the size it will be printed
An on-screen fidelity score tells you whether the SVG looks like your image, not whether it will hold up on a banner. Start from the largest clean source, trace in flat colours, check tips, curves and lettering at high zoom, repair locally, fix the key colours, then send the format the printer asks for. You can try VectoFix with 3 full-resolution exports; Pro is a one-time €39.
Frequently asked questions
Is SVG accepted for large-format printing?
Often, but not always: some printers prefer a vector PDF, an AI or an EPS. Ask before sending; an SVG can be saved as a vector PDF in Inkscape.
What PNG size do you need to vectorize a logo for a banner?
The largest available. On our logo printed 2 m wide, the outline was up to 8 mm off from a 300-pixel PNG, against 2.4 mm from 1,200 pixels.
Is a good fidelity score enough?
No. It compares the SVG with your PNG, at the PNG's size. All our traces scored above 98.7 out of 100, while their accuracy at banner scale ranged from 2 to 17 mm.
Do the logo's colours stay exact?
Not always to the exact code: on our logo, white became #FEFEFE and the cyan shifted slightly. Put the brand colours back in an editor and ask the printer how to specify shades.
Can I repair just one letter?
Yes. In VectoFix, the Brush re-traces only the painted area. For a letter that is illegible in the source, redrawing it by hand is still safer.
A vector export that lost some detail?
VectoFix shows you exactly where, and lets you fix it with a single brush stroke — full trial, on your own machine.
Get VectoFix