How to Vectorize a Low-Resolution Logo Without Losing Important Details
Logo received by email, screenshot or avatar: what we measured on sources from 64 to 400 pixels, whether to enlarge before tracing, and how to repair what is missing locally.
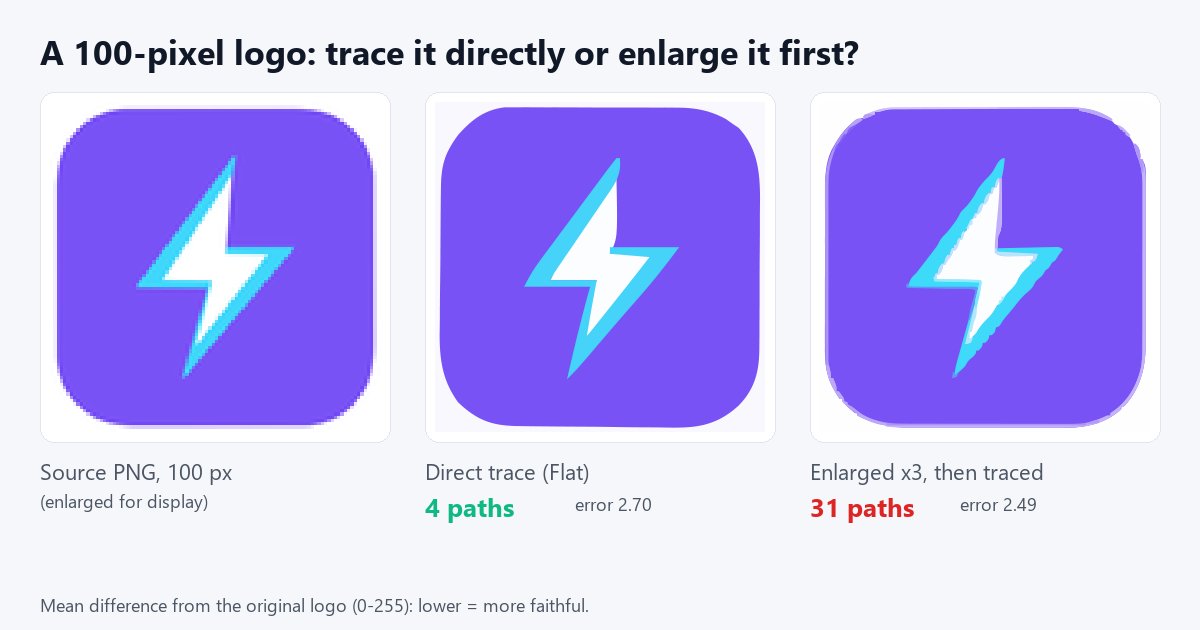
Vectorizing a low-resolution logo works if you start from the best source you can find, trace in flat colours, check the thin parts at high zoom and repair them locally. What you cannot do is recover detail that is not in the image: a tracer redraws what it sees, it does not invent what is missing.
A logo arrives as a 200-pixel PNG pulled from a website, an email signature or a social media avatar, and you need a clean vector. To see what you can realistically expect, we shrank a demo logo (a purple square with a lightning bolt, three colours) to 64, 100, 200 and 400 pixels wide, then traced it with VectoFix's Flat preset. The error is the mean difference (from 0 to 255) between the rendered SVG and the original logo: the lower it is, the more faithful the trace. For the general technique, see our complete guide to vectorizing an image.
What should you try before vectorizing?
Look for a better source. Ask the client or designer for the original file, check the website for a larger version, a press kit or an SVG already in use. Ten minutes of searching can save an hour of repair, and our measurement shows why: compression quality matters more than pixel count.
- Clean 100-pixel PNG: error 2.70, with 4 paths for a logo that has 3.
- 400-pixel JPEG (quality 40): error 3.00 and 57 paths, so less faithful and noisier than the PNG four times smaller.
- 100-pixel JPEG (quality 40): error 6.14 and 26 paths.
Between two files, prefer the one that has not been recompressed, even if it is smaller. If all you have is a screenshot of a screenshot, that is the hardest case, which we cover in jagged edges after vectorization.
How small can a simple logo be and still vectorize well?
For a flat-colour logo traced directly, the error drops quickly: 6.18 at 64 pixels, 2.70 at 100, 1.48 at 200 and 0.77 at 400. The number of paths stays roughly stable, between 4 and 5, which is what you expect from a simple logo. At 64 pixels the trace is recognizable but its corners are rounded: the image simply does not contain the information for a sharp angle.
So there is no magic threshold, it depends on the use. For an avatar or a thumbnail, 100 pixels is enough. For cutting or large-format printing, where corners show, aim for 200 pixels or more, or get the original. It is the same logic as in our article on a blurry logo when enlarged, seen from the vector file's side.
Should you enlarge the image before tracing it?
It is advice you read everywhere, and our measurement qualifies it strongly. We enlarged each source three times (Lanczos resampling) before tracing, then compared with the direct trace.
- 64 pixels: error from 6.18 to 3.83 (a real gain), but from 5 to 20 paths.
- 100 pixels: error from 2.70 to 2.49 (a slight gain), but from 4 to 31 paths.
- 200 pixels: error from 1.48 to 1.23, but from 4 to 32 paths.
- 400 pixels: error from 0.77 to 0.98, a less faithful result, with 52 paths instead of 4.
Enlarging sharpens the edges, but it also multiplies the small stray paths along the edges (you can see them in the cover image). For a three-colour logo, going from 4 to 31 paths is a poor price for 0.2 points of fidelity. Enlarging is only worth it below roughly 100 pixels, and you then need to clean up afterwards, with the speckle filter or the method in fixing tiny shapes and artifacts. In VectoFix, enlargement is actually used locally: the Brush re-traces the painted zone after enlarging it up to three times, without touching the rest of the trace.
Which details are most at risk?
Thin lettering, small counters (the inside of an 'e' or an 'a') and fine gaps between two shapes. In a small image, a stroke is only one or two pixels wide, which leaves almost nothing to follow. The tracer then merges that stroke with its neighbour, or erases it as noise. We explain this mechanism in why PNG to SVG conversion doesn't look like the original.
A global setting does not solve this: raising the speckle filter removes the specks but also the thin strokes, and lowering the colour count merges neighbouring tones that are sometimes two real colours. This is why a local repair is safer than another pass with different sliders.
How do you repair what was lost?
Locate the damaged zones, then re-trace them locally, as in how to fix an SVG after automatic vectorization. VectoFix does it by painting over the zone with the Brush, with a damage map showing where the SVG departs from your image. For letters that are simply unreadable in the source, the honest options are to retype the text in a matching font, or to redraw those few shapes by hand in an editor such as Inkscape.
What limits should you accept?
A tracer follows pixels. If the source is blurry, the SVG will have rounded corners where the original had sharp ones, as in our 100-pixel example. If a thin line was lost in the image, it is gone for good. Tell the client what to expect, and get the original artwork if the result must be exact: laser cutting or signage will not forgive a rounded corner.
Conclusion: best source first, direct trace, local repair
A small logo can become a good SVG when its shapes are simple. Start from the least compressed source, trace it directly in flat colours, enlarge only very small images, then repair what matters. You can try VectoFix with 3 full-resolution exports; Pro is a one-time €39. If you are starting from scratch, vectorizing a PNG logo step by step describes the full method.
Going further: if the logo is headed for a banner or a sign, see how to convert a logo from PNG to SVG for large-format print, where we measure how far a trace drifts when enlarged to 2 metres.
Frequently asked questions
Can I vectorize a very small logo?
Yes, but the result is limited by the pixels available. In our measurement, a simple 64-pixel logo gives a recognizable trace with rounded corners, and a logo of 200 pixels or more gives a clean one.
Will the SVG have more detail than the PNG?
No. A tracer redraws what is in the image, it does not recover missing detail. It can, however, make the edges sharp and the file scalable.
Should I enlarge the image before tracing?
Rarely. On our demo logo, a x3 enlargement clearly improved the trace only at 64 pixels, and multiplied the path count by 4 to 13. For damaged zones, re-tracing locally is more effective.
Is a large JPEG better than a small PNG?
Not necessarily. On our logo, a 400-pixel JPEG at quality 40 was less faithful (error 3.00) than a clean 100-pixel PNG (error 2.70): compression artifacts cost more than missing pixels.
Is it worth asking for the original file?
Almost always: a better source saves more time than any repair, and it is essential if the result must be exact (cutting, signage, large-format printing).
A vector export that lost some detail?
VectoFix shows you exactly where, and lets you fix it with a single brush stroke — full trial, on your own machine.
Get VectoFix